 step 1: find a table, any table
I decided to put together a micro keyboard rig for some upcoming gigs. Here’s
why…
3 Constraints of a Keyboard Rig
-
Cover the necessary sounds (universal constraint)
Duh, but also difficult. When a set of music requires piano, B3, Wurlitzer,
Rhodes, MiniMoog, CS-80, CP-80, SH-101, Arp String Ensemble, DX7, RS-09, etc.
I obviously have to choose where to use substitute sounds and where the
original keyboard must be used. The other instrumentalists in the traditional
rock band don’t have this problem to the extent that keyboardists do. -
‘Alive’ (personal constraint)
There is nothing nice about feeling like I could easily be replaced by a
backing track. If I am there to perform, I would prefer to play real analog
synths and acoustic or electro-acoustic mechanical instruments. I would
prefer to use my 30+ years of piano and musical experience to perform music.
No offense to the spacebar jockeys of the world, I just wanna actually play. -
Reasonably sized (universal and personal)
With Grizzly Bear I am extremely fortunate to be allowed to bring enough gear
to fill an entire 8x8 riser. Obviously, that is a rare and coveted position
to be in. The rest of the time, I have to figure out how to get gear to/from
gigs and fit on stages of all sizes. When I lived in Los Angeles, I was able
to bring larger gear to gigs because I drove an SUV. Living in Brooklyn has
forced a more minimal approach. What can fit in the trunk of an taxi/uber?
My upcoming tour with Lanz Projects will
be using a rental car for transportation and we will be playing small/medium
stages.
This calls for a microrig!
 nobody puts micro in a corner
5 Constraints of a Micro Keyboard Rig
-
Fits into carry-on luggage
We are flying to the Midwest, and baggage fees add up.
-
Single mono output
I usually like to send a single mono output through a DI and into an
amplifier with a microphone on it. It is a simple setup and gives me the
control I need. -
No Laptop
Just don’t. I mean, go ahead. I am just not gonna do it.
-
Versatile: mono/poly synths, samples
The coverage constraint from above applies here. What sounds am I willing to
sacrifice/change? I always need at least a Poly and a Mono synth for the type
of music I enjoy playing. That’s a start, then my usual move is to go weird
or go home. -
Quickly assembled
Make it easier on a whiskey’d-up self.
Philosophy: Always two, never one
How can I have the most sound options with the least amount of keyboards/space?
I have two hands, so I need at least two separate keyboards or sound sources.
Here is what I will be flying with to the Midwest:
- Arturia MiniBrute (MONO SYNTH) MIDI CONTROLLING Pocket Piano (POLY SYNTH)
- M-Audio KeystationMini32 CONTROLLING Raspberry Pi 3 running SamplerBox
(SAMPLER) - PO-16 (weirdo lil’ chiptune synth/sequencer jammer)
- Behringer 4 channel line mixer
- Line 6 DL4 (DELAY PEDAL)
By mixing four different sound sources I can create a more interesting hybrid
sound that adds up to more than the sum of its parts. Combining mono and poly
synths into one controller saves space and mental overhead.
I am covered on synth-y stuff. The MiniBrute can play synth bass or leads, the
Pocket Piano can produce poly pads or arpeggiated textures. However, for my
upcoming gigs I need to be able to play some piano samples.
Unfortunately I hate every piano sample on every keyboard – particularly piano
samples on Scandinavian red keyboards that have been disguised in a different
color or even housed in completely ridiculous piano-sized(!) shame-boxes.
Fuck!
Anywayyyy…Back when I lived in Los Angeles my friend Bram gave me a Kontakt
instrument (set of samples) sampled from his own upright piano. Perfect. Now I
have a weirdo piano that I don’t hate. The only problem is I would be forced to
use a laptop to play a Kontakt instrument or play the samples in Mainstage.
I think this is a very common dilemma for keyboardists: Do I violate the code
of ‘real’ keyboardists and bring a laptop, wrestle with a hardware sampler that
is probably limited in functionality and takes up too much space, or just play
the part on a different synth/keyboard?
Almost always I would play the part on some other keyboard that will sound good.
But playing cool samples as a keyboard instrument can be very rewarding and
interesting. I am not talking about hitting a key and watching background vocals
go by. What about a teapot’s beautiful whistle? I think stacked minor seconds
will be a very pleasant ‘synth texture’ to mix in with other ‘real’ sounds. The
world of sound is vast and adding a little concrète to your musique is never a
bad idea.
Philosophy: No laptops
To avoid using a laptop, I decided to build a fully polyphonic sampler out of a
Raspberry Pi 3 (RPI3). It is small, very configurable, and can easily cover the needs
of a sample player for cheap.
The following is the path I took to get my sample player working. Please let me know
in the comments if you have any suggestions or questions.
WARNING: This section is a bit more technical.
How to build a RPI3 sample player
- Install the OS on the SD card
- I tried the ready-to-use disk image from
SamplerBox, but I was correctly worried
that some packages hadn’t been recently updated in that image. After
looking at the SamplerBox source code, I decided I wanted to control the
build from the ground up (dealing with any dependency problems along the
way) so I decided to put Raspbian Stretch Lite on the SD card and
manually install SamplerBox from GitHub. - I find peace of mind knowing that I am up to date on packages. Also, it
turned out that the samplerbox.py configuration file in the GitHub repo
was newer/different than the one in the pre-compiled disk image (which
makes sense), and I wanted vim on the damn pi.
- I tried the ready-to-use disk image from
- Set up the USB stick to mount automatically
- Change the local samplerbox.py config file’s constant ‘SAMPLES_DIR’ to the
directory the USB stick mounts to.
samplerbox.py - Set up a systemd service to run SamplerBox as a daemon on boot. The manual
install doesn’t run the python script on boot, because why would it? I used
an article like
this
to set the service up. - Order, solder, and install a DAC audio piHat
- It is supposedly well known that Raspberry Pi audio is crap. I ordered
this relatively cheap DAC piHat to
handle the Digital to Analog conversion and my pi is sounding good.
- It is supposedly well known that Raspberry Pi audio is crap. I ordered
- Modify the case (optional)
- I had a case from a previous project, so I drilled a new hole to fit an
1/8” stereo cable and broke a lot of plastic making sure the piHat fit.
Fun.
- I had a case from a previous project, so I drilled a new hole to fit an
- Make a stereo to mono summing cable (1/8” TRS male to 1/4” TS male)
- The pi DAC output is 1/8” stereo. I need to convert that to mono to go
into my Behringer mixer with no signal loss. - Wow, these cables just don’t exist. Read
this great article about why you
should never just tie two outputs directly together to sum into mono.
This cable was annoying to build, but it works great!
- The pi DAC output is 1/8” stereo. I need to convert that to mono to go
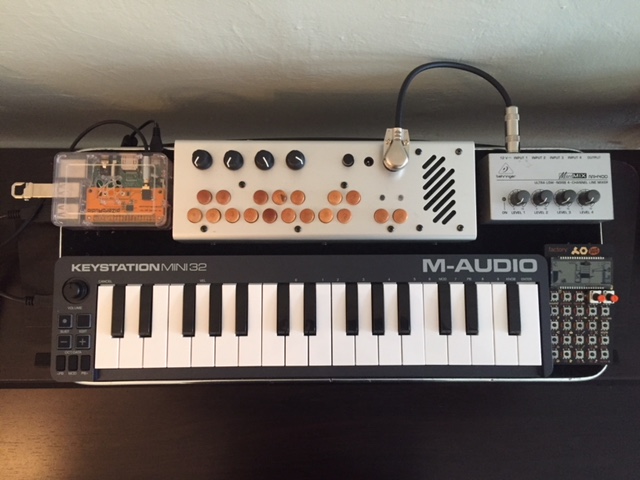
Here’s a pic of the pedalboard with (clockwise) RPI3, Pocket Piano, Behringer
mixer, PO-16, and M-Audio midi controller:
Good noise to you, friends.